Is your tattoo machine not working? Here is a list of the top 10 tattoo machine problems you may encounter. We’ve been in the business of making them for close to a decade now and we’ve encountered our fair share of problems and have come up with just as many fixes.
1. The Throw is too Weak
Troubleshoot: You are running the machine and the needle is barely moving. No matter how much you turn up the voltage, the needle does not appear to have enough up and down motion. This may be caused by a back spring that does not have enough tension.
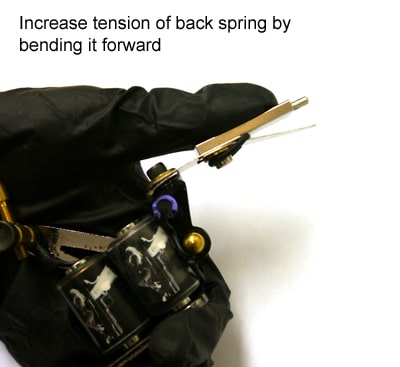
Fix: Loosen the back spring screw, flip the back spring/armature bar/front spring assembly around and turn it around so that the front spring is facing downward on the other side of the frame (basically you did a 180 with the assembly). Carefully bend the back spring downward to create more tension, do this a little at a time, a little goes a long way. Put the assembly back in its original position and tighten.
2. My Grip Keeps Loosening
Fix: 3 possible reasons
1) Even though you may have tightened the hex bolts on the grip and the tube on a 3 piece metal tube assembly, you may not have tightened the hex bolt enough. Some of those hex bolts on stainless steel or aluminum grips (if they have been used for a long time) get worn down so you may need to really tighten it in order to get it to clamp onto the tube. Just be careful not to strip the head, or your left with a useless grip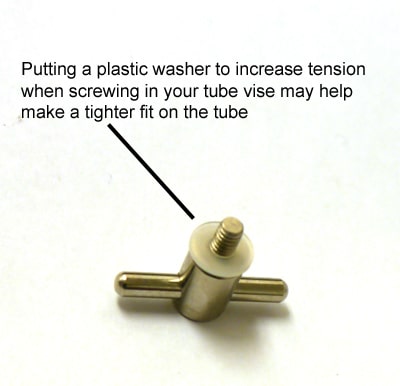 2) If the thumb screw of your tube vise tightens but the tube and grip doesn’t seem to, it may be because the point where your thumb screw goes into the frame is not getting enough tension. This can be fixed by adding in a spacer washer. Sometimes a plastic one is better than a metal one as plastic compresses more when tightened.
3) If the above 2 fixes don’t work, check the threading on the thumb screw. Through wear and tear, the tip of the screw thread will wear down faster than the rest of it. This is because you are mainly screwing in the tip when you tighten. If the threading appears worn, its time to get a new thumb screw.
3. My Tattoo Machine was Working Fine Till I Took it Apart
Troubleshoot: So you decided to take apart your machine and when you put it back together it is not working anymore.
Fix:
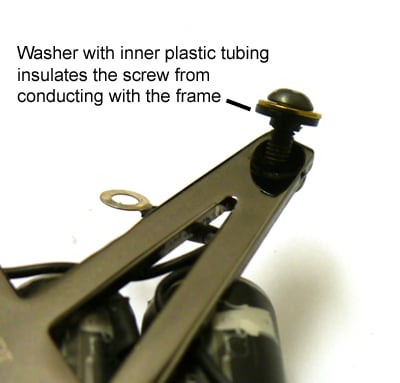
There are quite a few parts and aside from remembering where they were supposed to go, you should have noted which direction certain washers faced and where along the screws they were oriented. For example, both the top binding post screw and the back binding post screw should be insulated from the frame by a plastic or rubber washer. Most tattoo machines will have a simple washer on one side and a washer with an elongated plastic tube sticking out from the other. The plastic tube end should go into the frame. This tube insulates the threading of the screw so it does not allow current to pass to the frame. Also, the 2 circular connectors from the coils/capacitor assembly must be touching the top binding post and the back binding post, if they are behind the plastic washer, they will either not work, or will not work as effectively.
4. My Tattoo Machine Cuts in and Out
Troubleshoot: This is likely caused by a weak connector in the circuit somewhere along the tattoo machine
Fix:
If you have taken apart your machine at any time before, inspect the wiring to ensure no wires got clamped or damaged when you were putting them back on. The wires are not very thick and are attached by small solder joints, if any of those joints were damaged, the machine will cut in and out. Another possibility is the clip cord not making a full connection. This may be from an oxidized point of contact. You can fix this by taking a bit of sand paper and sanding clean the clip cord prongs. If the machine cuts in and out when you move it in certain angles, it is likely caused by a clip cord not making a full connection.
5. I have to Turn up the Voltage to Max to get the Machine to Run
Troubleshoot: This is likely the same issue as No. 3 where your springs do not have enough tension. Same fix as No.3.
Fix:
Loosen the back spring screw, flip the back spring/armature bar/front spring assembly around and turn it around so that the front spring is facing downward on the other side of the frame (basically you did a 180 with the assembly). Carefully bend the back spring downward to create more tension, do this a little at a time, a little goes a long way. Put the assembly back in its original position and tighten.
6. Sparking Between the Front Spring and Contact Screw
Troubleshoot: Some tattoo machines will spark a little bit but if you get excessive sparking then it may be a problem. Possible causes of excessive sparking is a rear spring that has been bent too tight, installation of a new front spring that has been plated or a bad capacitor.
Fix: Rear spring too tight
This would be the opposite of bending the rear spring for more tension, loosen the back spring screw, flip the back spring/armature bar/front spring assembly around and turn it around so that the front spring is facing downward on the other side of the frame (basically you did a 180 with the assembly). Carefully bend the back spring upward to decrease the tension. Put the assembly back in its original position and tighten.
Fix: New front spring
Not much of a fix here to be honest, you’ll just need to run the machine for a while till the contact screw takes off the plating layer and then it should stop sparking. If your machine is brand new and is sparking, this may be the fix for it.
Fix: Bad capacitor
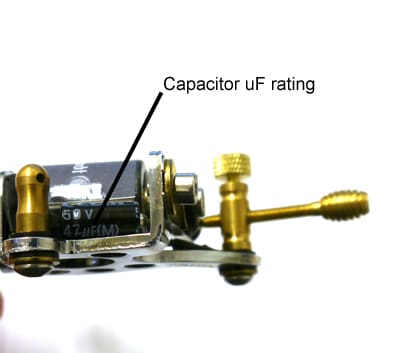
If you have a capacitor that is the wrong uF, then it may cause the sparking. Liners will need to run a lower uF and shaders will need to run a higher uF capacitor. You may want to drop by Radioshack to pick up a few and test them with your setup. They are easy to solder on and off.
7. Needles are Chewing up the Skin
Troubleshoot: This is a tough one as it may simply boil down to lack of experience working with your needle depth. However, if this pertains to problems with a tattoo machine, two possible causes is your armature bar/springs assembly is crooked or your frame geometry is messed up.
Fix:
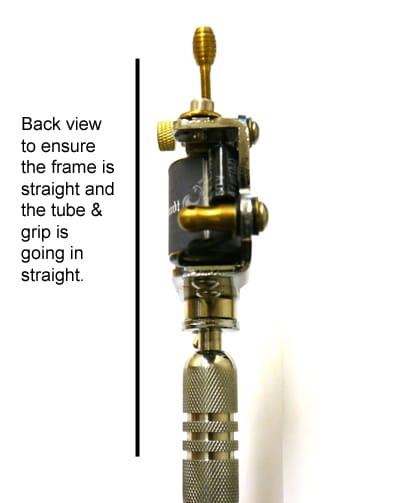
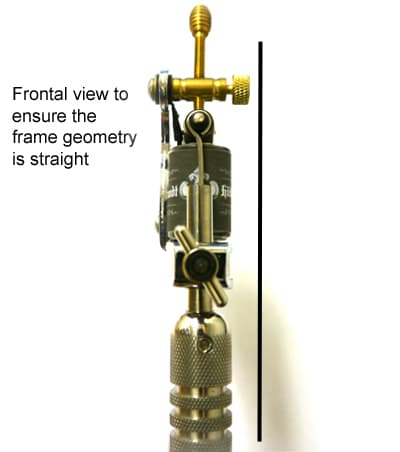
The armature bare/springs assembly is a simple one as you’ll just need to ensure that the back spring connecting to the front spring and the armature below are positioned so they form a straight line in relation to the back binding post. There are tools that you can use to ensure you have them straight but generally speaking, eyeballing will do just fine. If your frame geometry is messed up, your out of luck, look at the machine from the top, midline and forward position from the back binding post. If the frame is noticeably bent in any of these views, you have bad geometry. Also, if you put the grip in and you can see that it is going in at a slant, same deal. It’s possible to bend the frame, if this is the case, please see the next troubleshoot on our list.
8. My Grip is coming out of the Tube Vise at a Slant
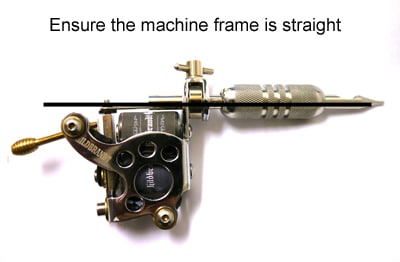
Troubleshoot: Title says it all; your tube grip is coming out of the tube vise at a slant. This is due to poor geometry of the frame.
Fix:
This fix is not highly recommended as you run the risk of really messing up your frame. However, if you must, we suggest you get a stainless steel tube and grip and tighten it to the tube vise. Note which direction the slant is and put a thick towel on a sturdy table. Position the machine on the table so you have decent leverage against the slant with the position you want the tube grip to move towards facing downward. Hold the grip firmly in your hand and press downward. Monitor your strength; you do not want to overdo it. It is better to have bent too little then it is to bend too much as you can always try again.
9. My Tattoo machine keeps getting Hot
Troubleshoot: Possible causes are you are using too much voltage, springs are too heavy of a gauge or your armature/springs setup has too much tension.
Fix: Armature/springs too much tension
Same as number 6, opposite of bending the rear spring for more tension, loosen the back spring screw, flip the back spring/armature bar/front spring assembly around and turn it around so that the front spring is facing downward on the other side of the frame (basically you did a 180 with the assembly). Carefully bend the back spring upward to decrease the tension. Put the assembly back in its original position and tighten.
Fix: Too much voltage
If you need to run the machine at max voltage or near max, there is something wrong with the way you tuned. You’re going to need to adjust the tensions on the springs or gap of the front spring to the contact screw to lower the amount of voltage necessary to get it to run right.
10. My Tattoo Machine runs good and then Loses Power
Troubleshoot: This is a doozy as there are many possibilities. Common ones include: bad capacitor, bad clip cord or foot pedal and oxidizing contact points.
Fix: Bad capacitor
Only way you are going to figure this one out is if you have another capacitor or entire coil setup to troubleshoot against the suspect one. You can buy capacitors at Radioshack for cheap.
Fix: Bad clip cord or foot pedal
Clip cords and foot pedals will wear down over time, especially if you yank on the wire here and there. You can troubleshoot them if you have another clip cord or foot pedal to test with. Sanding down the connecting prongs of the clip cord may help as oxidization can build up at those points causing a progressively poor connection. Among the products we sell the most to shops, other than needles and ink, is foot pedals and clip cords because they do wear down but at least they are cheap to buy!
Fix: Oxidizing contact points
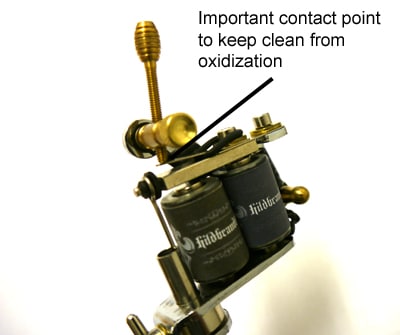
You should always maintain a clean contact point for your contact screw, front spring, clip cord and to a lesser extent, the connectors to the top binding post and back binding post. Some steel wool will do the trick, just give the points a good buffing every couple of weeks to ensure oxidization does not build up to bog down your machine.
